抽离代码&&模拟React的生命周期
这一章的目标是抽离《走近React的第二天》中可复用的代码部分同时模拟React的部分基础生命周期,这里你需要对React的生命周期有一点基础的了解,明白每个周期的作用,这样才能方便你去学习这一章的内容。
目标
React生命周期
React提供的生命周期在React实际开发过程中是十分重要的,网上已经有很多关于React的生命周期的介绍,就不过多的赘述了,这里分享几个我觉得不错的介绍详解React生命周期、React 生命周期。
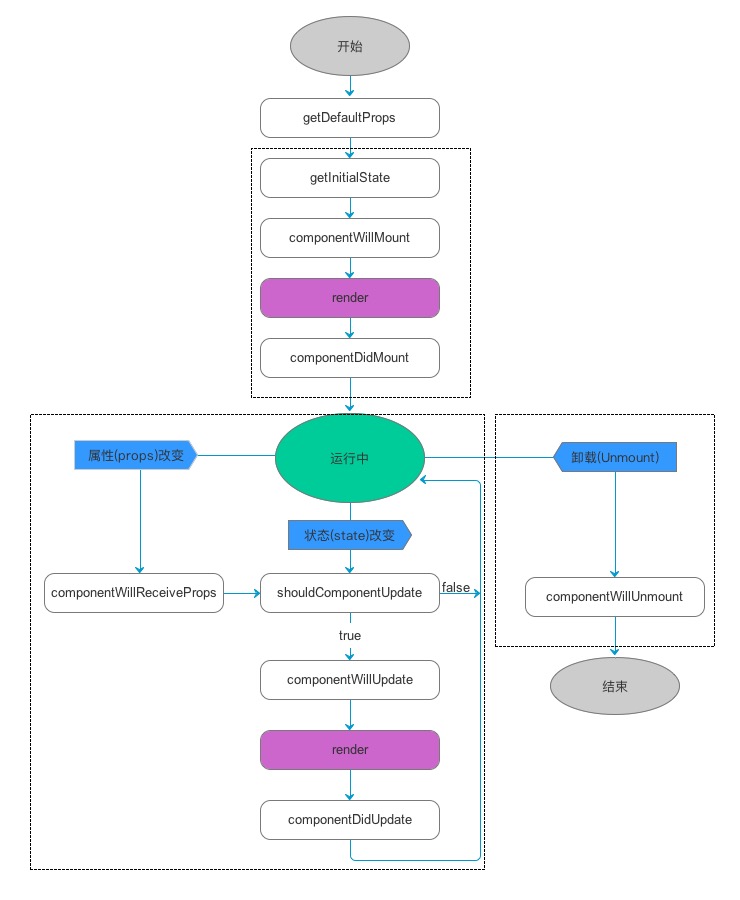
(图一:React生命周期)
(图二:效果图)
实现方案
首先在父组件Component中抽离出Render、setState、bindEvent、createDOM等可复用方法,使得子组件可以通过extends继承的方式拿到Component中抽离出的方法。
在渲染的时候通过判断目前是否已完成渲染(this.$element)以及调用_createDOM来进行生命周期的判定。
componentWillMount 该生命周期应该是在组件将要渲染之前触发,所以前置条件是(this.$element)为undefined且在appendChild方法调用之前触发。
componentDidMount 该生命周期应该是在组件第一次完成渲染之后触发,所以前置条件是(this.$element)为当前最近的DOM节点的且在appendChild方法调用之后再触发。
shouldComponentUpdate 该生命周期应该是一个比较特殊的生命周期,该生命周期应该是在组件已经完成渲染且State中数据修改之后且该生命周期返回值为true的时候才会触发,在组件中判定该生命周期返回值为true才会继续完成渲染。
componentWillUpdate 该生命周期应该是在组件已经完成渲染且State中数据修改之后触发,所以前置条件是(this.$element)已有DOM节点的且在replaceChild方法调用之前再触发
componentDidUpdate 该生命周期应该是在组件已经完成渲染且State中数据修改之后触发,所以前置条件是(this.$element)已有DOM节点的且在replaceChild方法调用之后再触发
父组件Component
Block1
2
3
4
5
6
7
8
9
10
11
12
13
14
15
16
17
18
19
20
21
22
23
24
25
26
27
28
29
30
31
32
33
34
35
36
37
38
39
40
| class Component{
constructor(props={}){
this.props=props;
}
setState(nextState){
this.state={...this.state,...nextState};
this._render();
}
_createDOM(htmlDom){
const fragment = document.createElement('div');
fragment.innerHTML = htmlDom;
return this._bindEvent(fragment.firstElementChild);
}
_bindEvent(el){
el.getAttributeNames().forEach(name => {
const matches = name.match(/^on([a-z]+)$/);
matches && el.addEventListener(matches[1], new Function('return ' + el.getAttribute(name)).bind(this)(), false);
});
Array.from(el.children).forEach( el => this._bindEvent(el));
return el;
}
_render(){
const oldElement = this.$element;
if (oldElement) {
if(this.shouldComponentUpdate&&!this.shouldComponentUpdate.bind(this)()){
return ;
}
this.componentWillUpdate&&this.componentWillUpdate.bind(this)();
this.$element = this._createDOM(this.render());
this.$container.replaceChild(this.$element, oldElement);
this.componentDidUpdate && this.componentDidUpdate.bind(this)();
} else {
this.componentWillMount && this.componentWillMount.bind(this)();
this.$element = this._createDOM(this.render());
this.$container.appendChild(this.$element);
this.componentDidMount && this.componentDidMount.bind(this)();
}
return this.$element;
}
}
|
子组件Counter
Block1
2
3
4
5
6
7
8
9
10
11
12
13
14
15
16
17
18
19
20
21
22
23
24
25
26
27
28
29
30
31
32
33
34
35
36
37
38
39
40
41
42
43
44
45
46
47
48
49
50
51
52
53
54
55
56
57
| class Counter extends Component{
constructor(props){
super(props);
this.state={
dateList:[]
}
this.add=this.add.bind(this);
this.reduce=this.reduce.bind(this);
}
componentWillMount(){
console.log('componentWillMount', this.state);
}
componentDidMount(){
console.log('componentDidMount', this.state);
}
componentDidUpdate(){
console.log('componentDidUpdate', this.state);
}
shouldComponentUpdate(){
return true;
}
componentWillUpdate(){
console.log('componentWillUpdate', this.state);
}
add(){
let newDateList=[...this.state.dateList]
newDateList.push(new Date().toString());
this.setState({dateList:newDateList});
}
reduce(){
let newDateList=[...this.state.dateList]
newDateList.pop();
this.setState({dateList:newDateList});
}
render(){
const {dateList}=this.state;
const oldElement=this.$element;
let color='blue';
if (dateList.length >= 5) color = 'red';
if (dateList.length <= 0) color = 'green';
console.log('render')
return (
`
<div>
<div style="color:${color}">当前List条数为 ${dateList.length}</div>
<button onClick="this.add">增加一条</button>
<button onClick="this.reduce">减少一条</button>
<ul>
${
dateList.map((item,index)=>`<li style="color:${color}">便签${index+1} 时间是:${item}</li>`)
}
</ul>
</div>
`
)
}
}
|
现在回头再看现在的Counter组件,是不是跟使用通过继承React的Component组件的写法已基本无异了,当然这里仅仅只是基础的模拟实现帮助理解学习。示例源码